简介
- 简介
- retrieveTargetRegistryCredentialsStep
- authenticatePushStep
- pullAndCacheBaseImageLayersStep
- PullAndCacheBaseImageLayerStep
- pushBaseImageLayersStep
- buildAndCacheApplicationLayers
- BuildImageStep
- PushContainerConfigurationStep
- PushBlobStep
- pushApplicationLayersStep
- FinalizingStep
- PushImageStep
阅读本文前,建议事先了解下 jib源码分析及应用 jib源码分析之细节
以常用 的forBuildToDockerRegistry 包含的步骤来分析
retrieveTargetRegistryCredentialsStep
这个步骤的本质是 获取Credential ,也就是用户名和密码,无需远程访问。
class RetrieveRegistryCredentialsStep implements AsyncStep<Credential>, Callable<Credential> {
  	public Credential call() throws CredentialRetrievalException {
  		...
  		Optional<Credential> optionalCredential = credentialRetriever.retrieve();
  		...
  	}
}

@FunctionalInterface
public interface CredentialRetriever {
  	Optional<Credential> retrieve() throws CredentialRetrievalException;
}
CredentialRetriever 是构建 RegistryImage 时拿到的
public class RegistryImage implements SourceImage, TargetImage {
	public RegistryImage addCredential(String username, String password) {
    	addCredentialRetriever(() -> Optional.of(Credential.basic(username, password)));
    	return this;
  	}
}

public class Credential {
	private final String username;
  		private final String password;
}
authenticatePushStep
Sends the authentication request and retrieves the Bearer authorization token.
这部分要参照官网 Token Authentication Specification
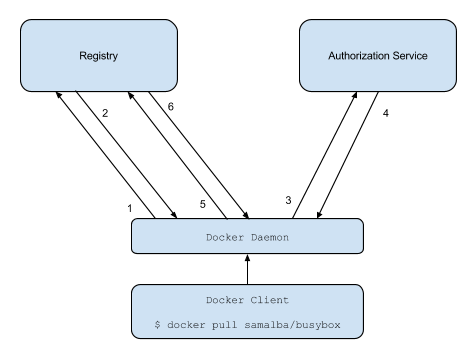
- Attempt to begin a push/pull operation with the registry.
- If the registry requires authorization it will return a 401 Unauthorized HTTP response with information on how to authenticate.
- The registry client makes a request to the authorization service for a Bearer token.
- The authorization service returns an opaque Bearer token representing the client’s authorized access.
- The client retries the original request with the Bearer token embedded in the request’s Authorization header.
- The Registry authorizes the client by validating the Bearer token and the claim set embedded within it and begins the push/pull session as usual.
authenticatePushStep 的结果是 得到一个 Authorization
public class Authorization {
  	private final String scheme;
  	private final String token;
}
Authorization 也可以根据Credential 直接构建。
现在很多系统都加强了安全性,用户名密码只是第一步,根据用户名密码拿到一个token,实际是根据token 校验安全性,token中包括你要下载的内容、有效期等。
PullBaseImageStep
先try with no credentials,行就直接结束了。If failed, then, retrieve base registry credentials and try with retrieved credentials. 构造一个retrieveBaseRegistryCredentialsStep,获取Credential,进而构建Authorization,然后再干活 pullBaseImage
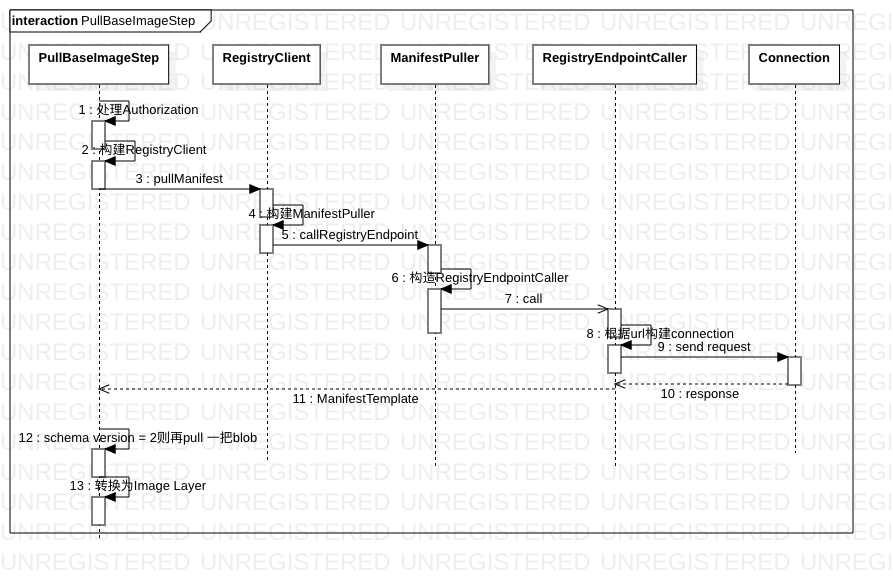
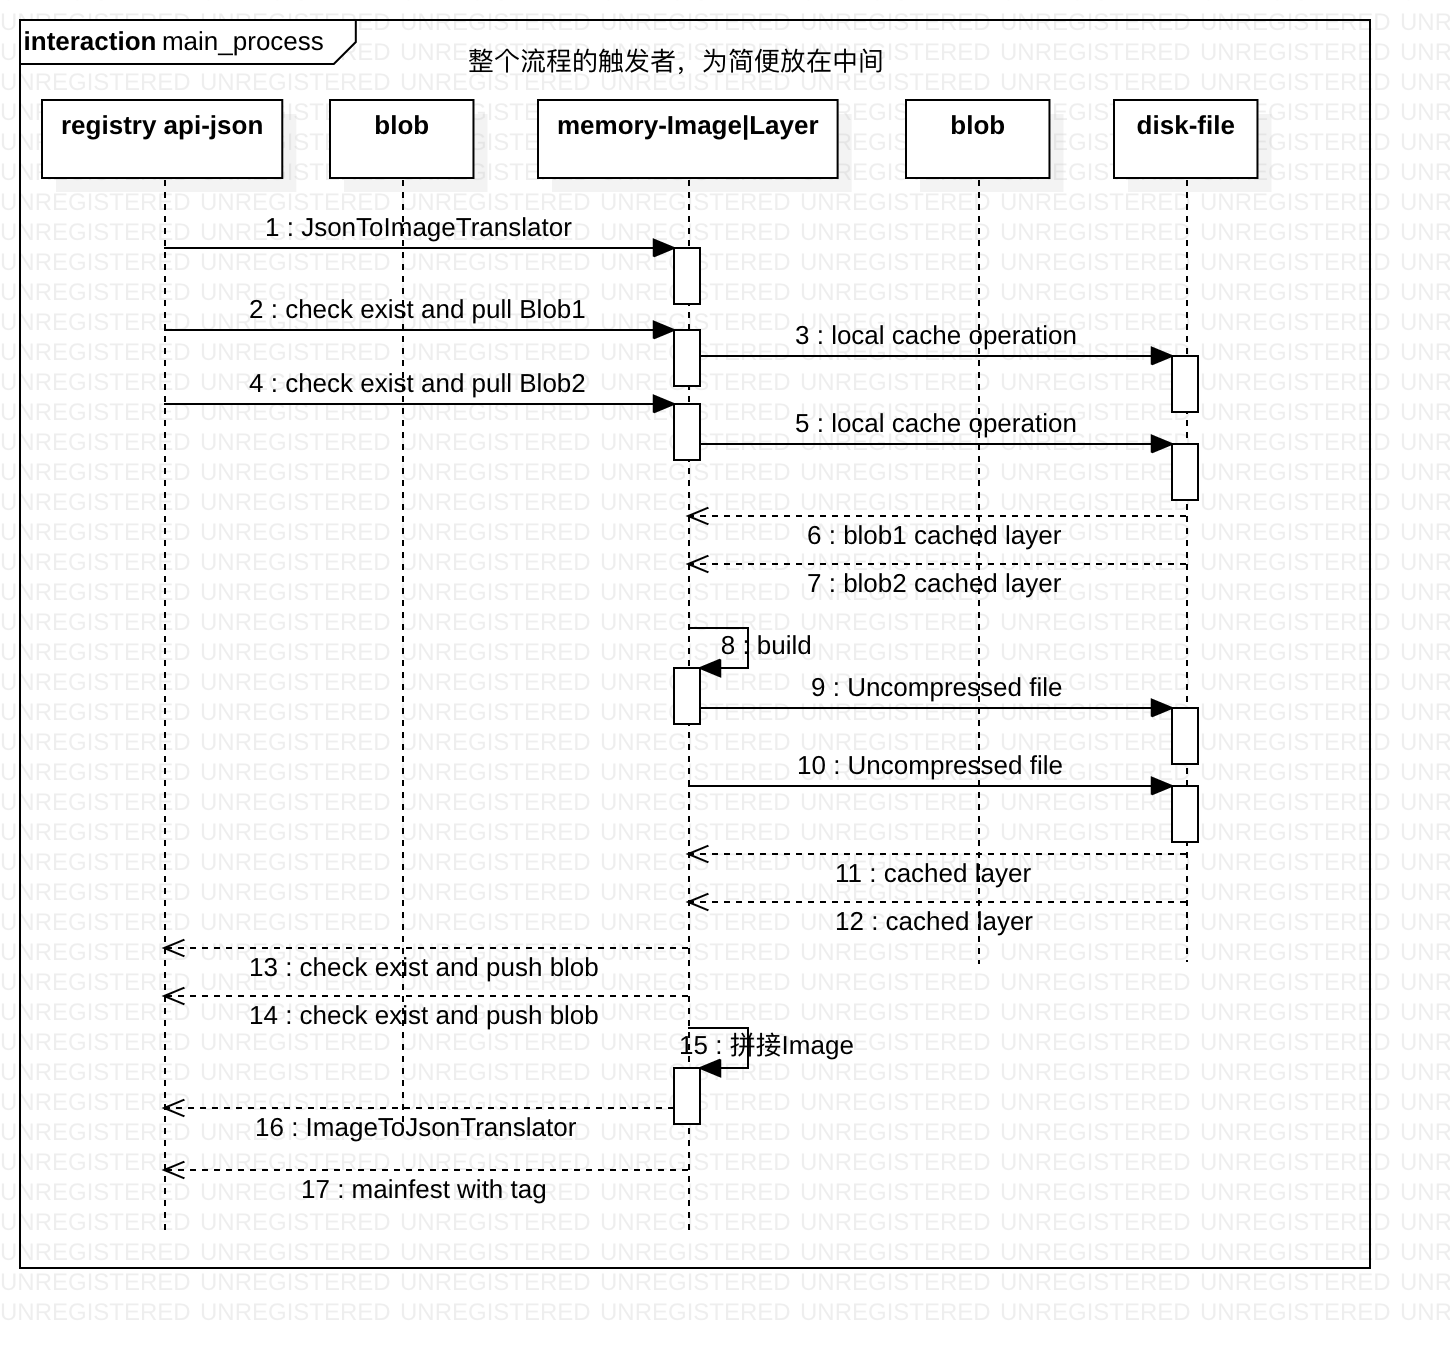
对于返回值,schema version= 1时,则只是将得到的 Manifest 数据 转换为 Image<Layer>。若schema version= 2,则需要拉取 一个blob(其中包括containerConfiguration),然后也转换为 Image<Layer> 并返回
可以看到,PullBaseImageStep 主要是拉取Image 元数据,如果本地没有base image 缓存,则要交给下一个Step
pullAndCacheBaseImageLayersStep
public ImmutableList<PullAndCacheBaseImageLayerStep> call() {
    BaseImageWithAuthorization pullBaseImageStepResult = NonBlockingSteps.get(pullBaseImageStep);
    ImmutableList<Layer> baseImageLayers = pullBaseImageStepResult.getBaseImage().getLayers();
    ...
  	ImmutableList.Builder<PullAndCacheBaseImageLayerStep> pullAndCacheBaseImageLayerStepsBuilder =
      	ImmutableList.builderWithExpectedSize(baseImageLayers.size());
  	for (Layer layer : baseImageLayers) {
    	pullAndCacheBaseImageLayerStepsBuilder.add(
        	new PullAndCacheBaseImageLayerStep(...,
            	layer.getBlobDescriptor().getDigest(),
            	pullBaseImageStepResult.getBaseImageAuthorization()));
  	}
  return pullAndCacheBaseImageLayerStepsBuilder.build();
  	}
pullAndCacheBaseImageLayersStep.call 真正干活的是PullAndCacheBaseImageLayerStep
PullAndCacheBaseImageLayerStep
public CachedLayer call() throws IOException, CacheCorruptedException { ...
try (...) {
Cache cache = buildConfiguration.getBaseImageLayersCache();
// Checks if the layer already exists in the cache.
Optional<CachedLayer> optionalCachedLayer = cache.retrieve(layerDigest);
if (optionalCachedLayer.isPresent()) {
buildConfiguration.getEventDispatcher().dispatch(new ProgressEvent(progressAllocation, 1));
return optionalCachedLayer.get();
}
RegistryClient registryClient = ...
CachedLayer cachedLayer = cache.writeCompressedLayer(registryClient.pullBlob(layerDigest));
...
return cachedLayer;
}
}
本地有则直接返回,无则下载
pushBaseImageLayersStep
实际工作的是 PushLayersStep
public ImmutableList<AsyncStep<PushBlobStep>> call() throws ExecutionException {
    try (...) {
        ImmutableList<? extends AsyncStep<? extends CachedLayer>> cachedLayer =
            NonBlockingSteps.get(cachedLayerStep);
        // Constructs a PushBlobStep for each layer.
        ImmutableList.Builder<AsyncStep<PushBlobStep>> pushBlobStepsBuilder = ImmutableList.builder();
        for (AsyncStep<? extends CachedLayer> cachedLayerStep : cachedLayer) {
          ListenableFuture<PushBlobStep> pushBlobStepFuture =
              Futures.whenAllSucceed(cachedLayerStep.getFuture())
                  .call(() -> makePushBlobStep(cachedLayerStep), listeningExecutorService);
          pushBlobStepsBuilder.add(() -> pushBlobStepFuture);
        }
        return pushBlobStepsBuilder.build();
    }
}
从 pullAndCacheBaseImageLayersStep 可以拿到一系列 PullAndCacheBaseImageLayerStep,对于每个PullAndCacheBaseImageLayerStep,拿到其执行结果 CachedLayer,然后构建 PushBlobStep
从这里也可以看到 ,jib 刚拉完base image,便又尝试重新push 了一下,意图何在呢?
buildAndCacheApplicationLayers
是一系列 BuildAndCacheApplicationLayerStep 的集合
jib 应用demo
Jib.from("busybox")
   .addLayer(Arrays.asList(Paths.get("helloworld.sh")), AbsoluteUnixPath.get("/"))
   .setEntrypoint("sh", "/helloworld.sh")
   .containerize(
       Containerizer.to(RegistryImage.named("gcr.io/my-project/hello-from-jib")
                                     .addCredential("myusername", "mypassword")));
addLayer 的方法签名JibContainerBuilder addLayer(List<Path> files, AbsoluteUnixPath pathInContainer) 表示将文件加入到 容器的特定目录下。最终一个 layerConfiguration 持有文件在host 上的地址、在容器内的地址和文件的访问权限(一个LayerEntry 可以表示的内容)
public CachedLayer call() throws IOException, CacheCorruptedException {
    ...
    try (...) {
        Cache cache = buildConfiguration.getApplicationLayersCache();
        // Don't build the layer if it exists already.
        Optional<CachedLayer> optionalCachedLayer = cache.retrieve(layerConfiguration.getLayerEntries());
        if (optionalCachedLayer.isPresent()) {
        	return optionalCachedLayer.get();
        }
        Blob layerBlob = new ReproducibleLayerBuilder(layerConfiguration.getLayerEntries()).build();
        CachedLayer cachedLayer =
          cache.writeUncompressedLayer(layerBlob, layerConfiguration.getLayerEntries());
        ...
        return cachedLayer;
    }
}
本地加入的layer 都是UncompressedLayer,先对其计算 digest 查询本地是否存在,如果已存在则直接返回对应的CachedLayer,否则写入到cache 目录 再返回。
BuildImageStep
等pullAndCacheBaseImageLayersStep 和 buildAndCacheApplicationLayerSteps 都弄完,开始执行 afterCachedLayerSteps
- imageBuilder = Image.builder(buildConfiguration.getTargetFormat());
- imageBuilder.set(base image layer).passthrough(base image config).fix(history)
- imageBuilder.set Add built layers/configuration, add history
- image = imageBuilder.build();
一个image的 config 包括
- Environment
- Labels
- healthCheck
- ExposedPorts
- Volumes
- WorkingDirectory
从目前看BuildImageStep 只是得到一个Image<Layer>,那image 信息本地不留一份儿?
PushContainerConfigurationStep
private PushBlobStep afterBuildConfigurationFutureFuture()throws ExecutionException, IOException {
	...
    Image<Layer> image = NonBlockingSteps.get(NonBlockingSteps.get(buildImageStep));
    Blob containerConfigurationBlob = new ImageToJsonTranslator(image).getContainerConfigurationBlob();
    BlobDescriptor blobDescriptor = containerConfigurationBlob.writeTo(ByteStreams.nullOutputStream());
    return new PushBlobStep(
      	...
      	authenticatePushStep,
      	blobDescriptor,
      	containerConfigurationBlob);
}
基本上没干啥事,根据Image
![]()
ImageToJsonTranslator Translates an Image into a manifest or container configuration JSON BLOB. 这里转为json 和转为 blob 是一样的,ContainerConfiguration 也要转换为blob 存储
PushBlobStep
public BlobDescriptor call() throws IOException, RegistryException, ExecutionException {
	...
 	RegistryClient registryClient = ...
    // check if the BLOB is available
    if (registryClient.checkBlob(blobDescriptor.getDigest()) != null) {			// 如果 registry 已经存在该blob,便直接返回
      	return blobDescriptor;
    }
	// todo: leverage cross-repository mounts
    registryClient.pushBlob(blobDescriptor.getDigest(), blob, null);
    ...
    return blobDescriptor;
}
若Registry 已有则直接返回,否则push blob
pushApplicationLayersStep
实质是执行 PushLayersStep,根据 buildAndCacheApplicationLayerSteps 拿到CachedLayers,然后根据每个 cachedLayer 构建PushBlobStep
FinalizingStep
Logs the message before finalizing an image build.
PushImageStep
Pushes the final image. Outputs the pushed image digest
call 方法主要是等待依赖任务执行完毕,然后执行afterPushSteps ==> afterAllPushed
private ListenableFuture<BuildResult> afterAllPushed() throws ExecutionException, IOException {
    RegistryClient registryClient = xx
    Image<Layer> image = NonBlockingSteps.get(NonBlockingSteps.get(buildImageStep));
    // Constructs the image.
    ImageToJsonTranslator imageToJsonTranslator =
        new ImageToJsonTranslator(image);
    / Gets the image manifest to push.
    BlobDescriptor containerConfigurationBlobDescriptor =
        NonBlockingSteps.get(NonBlockingSteps.get(NonBlockingSteps.get(pushContainerConfigurationStep)));
    BuildableManifestTemplate manifestTemplate =
          imageToJsonTranslator.getManifestTemplate(
              buildConfiguration.getTargetFormat(), containerConfigurationBlobDescriptor);
    // Pushes to all target image tags.
    List<ListenableFuture<Void>> pushAllTagsFutures = new ArrayList<>();
    for (String tag : buildConfiguration.getAllTargetImageTags()) {
        pushAllTagsFutures.add(
            listeningExecutorService.submit(
                () -> {
                  ...
                  // Pushes the image manifest for a specific tag
                  registryClient.pushManifest(manifestTemplate, tag);
                  return null;
                }));
    }
    DescriptorDigest imageDigest =
        JsonTemplateMapper.toBlob(manifestTemplate)
              .writeTo(ByteStreams.nullOutputStream())
              .getDigest();
    DescriptorDigest imageId = containerConfigurationBlobDescriptor.getDigest();
    BuildResult result = new BuildResult(imageDigest, imageId);
    Futures.whenAllSucceed(pushAllTagsFutures)
    return result;
}
前几行 构建 (containerConfiguration)BlobDescriptor 的逻辑与 PushContainerConfigurationStep 差异
- PushContainerConfigurationStep 根据 containerConfigurationBlobDescriptor 构建blob ,然后push 了
- afterAllPushed 根据 containerConfigurationBlobDescriptor 构建了BuildableManifestTemplate,根据继承图可以看到BuildableManifestTemplate 只有V22ManifestTemplate 和 OCIManifestTemplate 两个子类(两个子类除mediaType 外其它都一样)。
- 用户下载镜像 都是 image:tag格式,并不了解manifest deigest ==> 要维护manifest 和 image tag的关系
个人微信订阅号
