简介
建议先看下前文 虚拟网络
抠一抠概念
Macvlan and ipvlan are Linux network drivers that exposes underlay or host interfaces directly to VMs or Containers running in the host.
那么问题来了,什么是network driver?
A network device driver is a device driver that enables a network device to communicate between the computer and operating system as well as with other network computers and network devices.
In computing, a device driver is a computer program that operates or controls a particular type of device that is attached to a computer.[1] A driver provides a software interface to hardware devices, enabling operating systems and other computer programs to access hardware functions without needing to know precise details about the hardware being used.
A driver communicates with the device through the computer bus or communications subsystem to which the hardware connects. When a calling program invokes a routine in the driver, the driver issues commands to the device. Once the device sends data back to the driver, the driver may invoke routines in the original calling program. Drivers are hardware dependent and operating-system-specific. They usually provide the interrupt handling required for any necessary asynchronous time-dependent hardware interface.
网卡 ==> computer bus ==> network driver ==> Subroutine/子程序 ==> calling program
也就是network driver 在网卡 与操作系统之间,从这个角度看,跟磁盘驱动、鼠标驱动类似了。
macvlan 在虚拟化中的概念
要跟mac based vlan 有所区分,参见虚拟网络。
Macvlan, MACVLAN or MAC-VLAN allows you to configure multiple Layer 2 (i.e. Ethernet MAC) addresses on a single physical interface. Macvlan allows you to configure sub-interfaces (also termed slave devices) of a parent, physical Ethernet interface (also termed upper device), each with its own unique (randomly generated) MAC address, and consequently its own IP address. Applications, VMs and containers can then bind to a specific sub-interface to connect directly to the physical network, using their own MAC and IP address. 基于物理机网卡 physical interface 创建多个 sub-interface,拥有自己的MAC and IP ,直接接入physical network。
Macvlan and IPvlan basics 讲清了macvlan sub-interface 和 vlan-sub-interface 的异同
| 物理网卡 | vlan sub-interface | macvlan sub-interface | |
|---|---|---|---|
| mac/ip | all sub-interfaces have same mac address(ip 手动/自动配) | each sub-interface will get unique mac and ip address | |
| each sub-interface belongs to a different L2 domain using vlan(发的包自带vlan id,是数据帧的一部分) | exposed directly in underlay network | ||
| 配置文件 | 独立的网络接口配置文件 | 保存在临时文件/proc/net/vlan/config,重启会丢失 |
独立的网络接口配置文件 |
| 一般格式 | eth0 | eth0.1 | eth0:1 |
vlan sub-interface他们没有自己的配置文件,他们只是通过将物理网加入不同的VLAN而生成的VLAN虚拟网卡。如果将一个物理网卡添加到多个VLAN当中去的话,就会有多个VLAN虚拟网卡出现。
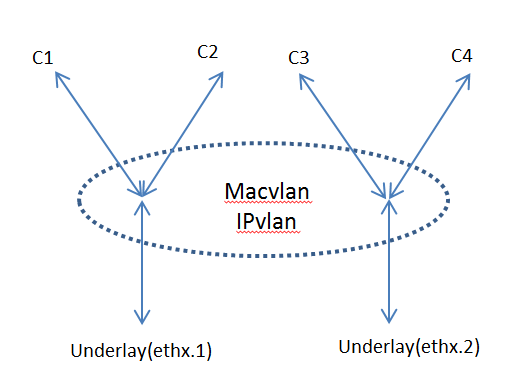
macvlan 本身跟vlan 没啥关系,如果不考虑虚拟化的概念,甚至可以理解为一个物理机插了多个网卡。但在容器里面通常跟vlan 结合使用(因为一个宿主机的上百个容器可能属于不同的vlan)。 Following picture shows an example where macvlan sub-interface works together with vlan sub-interface. Containers c1, c2 are connected to underlay interface ethx.1 and Containers c3, c4 are connected to underlay interface ethx.2.

为啥vlan 要有个sub interface?基于IEEE 802.1Q附加的VLAN信息,就像在传递物品时附加的标签。因此,它也被称作“标签型VLAN(Tagging VLAN)”。 IEEE 802.1QIEEE 802.1Q, often referred to as Dot1q, is the networking standard that supports virtual LANs (VLANs) on an IEEE 802.3 Ethernet network. The standard defines a system of VLAN tagging for Ethernet frames and the accompanying procedures to be used by bridges and switches in handling such frames. 这种vlan 和 MAC Based VLAN 没啥关系(因为vlan sub-interface 的mac 地址都一样),一种说法是vlan 的划分方式太多(基于交换机port、基于mac地址、基于ip地址等),各家交换机各搞各的也不统一,不能互通,干脆弄一个802.1Q 协议统一下,让数据包带标签吧。交换机发现数据帧里有vlan tag(物理机接口 要能给 数据帧打tag,所以要sub-interface)就按vlan tag 来,没有vlan tag 就按自家支持的 vlan 划分方法来。
Docker Networking: macvlans with VLANs
One macvlan, one Layer 2 domain and one subnet per physical interface, however, is a rather serious limitation in a modern virtualization solution. 这个说的是物理机时代,一个host 两个网卡,每个网卡属于不同的vlan(属于同一个vlan的话还整两个网卡干啥),而两个vlan 不可以是同一个网段。参见程序猿视角看网络
a Docker host sub-interface can serve as a parent interface for the macvlan network. This aligns perfectly with the Linux implementation of VLANs(这个表述用的有感觉,linux 对vlan的实现), where each VLAN on a 802.1Q trunk connection is terminated on a sub-interface of the physical interface. You can map each Docker host interface to a macvlan network, thus extending the Layer 2 domain from the VLAN into the macvlan network.
Docker macvlan driver automagically creates host sub interfaces when you create a new macvlan network with sub interface as a parent。vlan sub interface 创建完毕后,以其为parent 创建macvlan sub interface 由 macvlan driver 自动完成。
整体思路
以下实现基于docker1.13,物理机使用192.168.0.0/16网段,容器使用172.31.0.0/16网段。
- docker host,自定义ipam plugin负责ip地址管理,每个docker host运行一个ipam plugin,并根据ipam plugin创建local scope的macvlan network。
- 创建容器时使用macvlan网络
- 外置交换机负责容器之间、host之间、容器与host之间的连通性。
MACVLAN可以从一个主机接口虚拟出多个macvtap,且每个macvtap设备都拥有不同的mac地址(对应不同的linux字符设备)。
docker macvlan 用802.1q模式,对于一个交换机端口来说:
- 物理机和容器的数据包属于不同的vlan,so, 交换机端口设置为trunk;
- 物理机和容器的数据包属于不同的网段,so,在交换机的三层加一层路由,打通物理机和容器的两个网段。
macvlan网络
设置路由器或交换机
Docker Networking: macvlans with VLANs
本小节是2018.12.17补充,所以网段部分对不上
if you happen to have a Cisco IOS router
router(config)# interface fastEthernet 0/0
router(config-if)# no shutdown

router(config)# interface fastEthernet 0/0.10
router(config-subif)# encapsulation dot1Q 10
router(config-subif)# ip address 10.0.10.1 255.255.255.0
router(config-subif)# ipv6 address 2001:db8:babe:10::1/64

router(config)# interface fastEthernet 0/0.20
router(config-subif)# encapsulation dot1Q 20
router(config-subif)# ip address 10.0.20.1 255.255.255.0
router(config-subif)# ipv6 address 2001:db8:babe:20::1/64
…or Cisco Layer 3 Switch…
switch# configure terminal
switch(config)# vlan 10
switch(config)# vlan 20

switch(config)# interface fastEthernet0/0
switch(config-if)# switchport mode trunk
switch(config-if)# switchport trunk native vlan 1

switch(config)# interface vlan 10
switch(config-if)# ip address 10.0.10.1 255.255.255.0
switch(config-if)# ipv6 address 2001:db8:babe:10::1/64

switch(config)# interface vlan 20
switch(config-if)# ip address 10.0.20.1 255.255.255.0
switch(config-if)# ipv6 address 2001:db8:babe:20::1/64
可以看到,从交换机的角度看,也是与linux 类似的ip命令,配置ip、网段等。
物理机创建vlan的sub interface
使用802.1q vlan时,我们发出去的数据包,要有802.1q中的vlan tag。为了不影响物理网卡的正常使用,就是只有基于sub interface(eth1.10)来发送802.1q package。
-
Load the 802.1q module into the kernel.
sudo modprobe 8021q -
Create a new interface that is a member of a specific VLAN, VLAN id 10 is used in this example. Keep in mind you can only use physical interfaces as a base, creating VLAN’s on virtual interfaces (i.e. eth0:1) will not work. We use the physical interface eth1 in this example. This command will add an additional interface next to the interfaces which have been configured already, so your existing configuration of eth1 will not be affected.
sudo vconfig add eth1 10 -
Assign an address to the new interface.
sudo ip addr add 10.0.0.1/24 dev eth0.10 -
Starting the new interface.
sudo ip link set up eth0.10
基于sub interface创建docker macvlan 网络
docker network  create  -d macvlan \
    --subnet=172.31.0.0/16 \
    --gateway=172.31.0.1 \
    -o parent=eth0.10 macvlan10
创建容器,指定使用macvlan网络
docker run --net=macvlan10 -it --name macvlan_test5 --rm alpine /bin/sh