前言
本教程以hadoop1.2.1版本为例,搭建一个伪分布式集群,并在eclipse下编写WordCount代码并运行(eclipse无需安装插件)。
安装hadoop集群
这个就没什么要讲的了,搭建hadoop集群的教程网上有很多。简述一下本文的hadoop环境搭建完毕后的相关情况:
OS:                            ubuntu(在windows下virtualbox运行)
Hostname:                       hadoop
IP:                             192.168.56.171
操作hadoop集群的linux用户:      hadoop
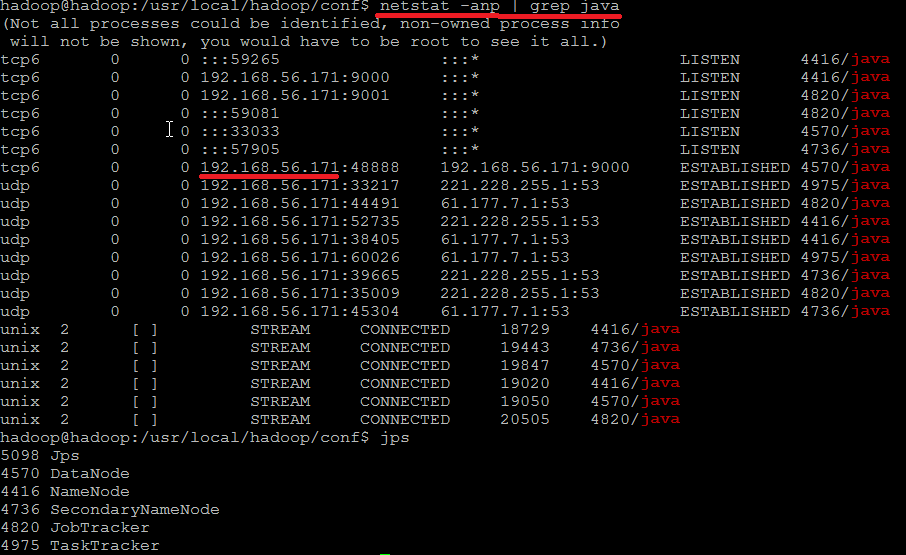
集群搭建完毕后,运行状态如下所示:

NOTE1: hadoop相关组件监听的ip必须为“192.168.56.171”,如果读者此处显示的是“127.0.0.1”,请自行调整。
NOTE2: 因为linux采用hadoop用户操作hadoop集群,hdfs中的文件默认也以hadoop用户作为owner,为避免windows端运行hadoop程序时因用户不一致带来的权限问题,在配置“hdfs-site.xml”时,加入以下代码:
<property>
	<name>dfs.permissions</name>
	# false表示不检查文件权限
    <value>false</value>
</property>
向hdfs提交测试文件(示例程序以此为输入)
在hdfs中构建目录结构
hadoop@hadoop:~$ hadoop fs –mkdir /user
hadoop@hadoop:~$ hadoop fs –mkdir /user/hadoop
hadoop@hadoop:~$ hadoop fs –mkdir /user/hadoop/input
编写测试文件/home/hadoop/test并提交
hadoop@hadoop:/usr/local/hadoop/conf$ cd
hadoop@hadoop:~$ cat test
hello
world
hello world
hadoop@hadoop:~$ hadoop fs -put /home/hadoop/test /user/hadoop/input/test
搭建windows端环境
编辑hosts文件
以管理员权限打开并编辑C:\Windows\System32\drivers\etc\hosts,添加以下代码:
192.168.56.171 hadoop 这样,示例程序便可以以hostname为`hadoop`的字符串代替linux虚拟机的IP。
安装eclipse,maven
创建demo项目
- 新建demo项目(new maven project)
-
配置pom.xml文件
<dependencies> <dependency> <groupId>org.apache.hadoop</groupId> <artifactId>hadoop-core</artifactId> <version>1.2.1</version> </dependency> </dependencies> - 右键项目,maven ,update project,下载依赖的jar文件(因为hadoop-core-1.2.1.jar依赖较多,此过程可能需要耗费较长时间)
-
下载hadoop-core-1.2.1.jar替换maven库中默认的
hadoop-core-1.2.1.jar。因为mapreduce程序运行时会检查windows本地相关目录的权限,windows与linux文件权限的不同会导致运行失败(此问题还可以通过为windows安装cygwin来伪装成linux解决)。所以注释掉hadoop core源文件/hadoop-1.2.1/src/core/org/apache/hadoop/fs/FileUtil.java中的以下代码:685private static void checkReturnValue(boolean rv, File p, 686 FsPermissionpermission 687 )throws IOException { 688 /*if (!rv) { 689 throw new IOException("Failed toset permissions of path: " + p + 690 " to " + 691 String.format("%04o",permission.toShort())); 692 }*/ 693 }修改完毕后,重新编译源码生成hadoop-core-1.2.1.jar
-
(此过程可选)创建
src/main/resourcessource folder,并在该source folder下创建hadoopfolder,将linux中hadoop集群的core-site.xml,hdfs-site.xml,mapred-site.xml拷贝到hadoop folder中。 -
创建
WordCount类public class WordCount { public static String INPUT = "hdfs://192.168.56.171:9000/user/hadoop/input/"; public static String OUTPUT = "hdfs://192.168.56.171:9000/user/hadoop/output/"; public static class WordCountMapper extends MapReduceBase implements Mapper<LongWritable, Text, Text, IntWritable> { private final static IntWritable one = new IntWritable(1); private Text word = new Text(); public void map(LongWritable key, Text value, OutputCollector<Text, IntWritable> output, Reporter reporter) throws IOException { String line = value.toString(); StringTokenizer tokenizer = new StringTokenizer(line); while (tokenizer.hasMoreTokens()) { word.set(tokenizer.nextToken()); output.collect(word, one); } } } public static class WordCountReducer extends MapReduceBase implements Reducer<Text, IntWritable, Text, IntWritable> { public void reduce(Text key, Iterator<IntWritable> values, OutputCollector<Text, IntWritable> output, Reporter reporter) throws IOException { int sum = 0; while (values.hasNext()) { sum += values.next().get(); } output.collect(key, new IntWritable(sum)); } } public static void main(String[] args) throws Exception { JobConf conf = new JobConf(WordCount.class); conf.setJobName("WordCount"); # 注释代码可选 //conf.addResource("classpath:/hadoop/core-site.xml"); //conf.addResource("classpath:/hadoop/hdfs-site.xml"); //conf.addResource("classpath:/hadoop/mapred-site.xml"); conf.setOutputKeyClass(Text.class); conf.setOutputValueClass(IntWritable.class); conf.setMapperClass(WordCountMapper.class); conf.setCombinerClass(WordCountReducer.class); conf.setReducerClass(WordCountReducer.class); conf.setInputFormat(TextInputFormat.class); conf.setOutputFormat(TextOutputFormat.class); FileInputFormat.setInputPaths(conf,new Path(INPUT)); FileOutputFormat.setOutputPath(conf,new Path(OUTPUT)); JobClient.runJob(conf); System.exit(0); } } -
maven项目创建完毕后,如下所示:

- 可以使用
hadoop fs -cat /user/hadoop/output/part-00000参看输出文件内容。
NOTE1:多次运行时,请注意移除output目录 hadoop fs -ls /user/hadoop/output
NOTE2:驱动代码有多种编写方式,如下代码所示:
public static void main(String[] args) throws IOException,
		ClassNotFoundException, InterruptedException {
	Configuration conf = new Configuration();
	Job job = new Job(conf, WordCount.class.getSimpleName());
	FileInputFormat.setInputPaths(job, INPUT_PATH);
	job.setMapperClass(MyMapper.class);
	job.setReducerClass(MyReducer.class);
	job.setOutputKeyClass(Text.class);
	job.setOutputValueClass(LongWritable.class);
	FileOutputFormat.setOutputPath(job, new Path(OUT_PATH));
	job.waitForCompletion(true);
}
建议
在windows上调试hadoop,怎么搞都不太爽,上述教程也只适用于特定的版本,还是建议打成可执行jar包,传送到hadoop所在主机上,使用hadoop jar xxxx.jar运行。
hadoop 2.x maven配置
<dependencies>
		<dependency>
			<groupId>org.apache.hadoop</groupId>
			<artifactId>hadoop-common</artifactId>
			<version>2.6.0</version>
			<exclusions>
				<exclusion>
					<groupId>jdk.tools</groupId>
					<artifactId>jdk.tools</artifactId>
				</exclusion>
			</exclusions>
		</dependency>
		<dependency>
			<groupId>org.apache.hadoop</groupId>
			<artifactId>hadoop-hdfs</artifactId>
			<version>2.6.0</version>
		</dependency>
		<dependency>
			<groupId>org.apache.hadoop</groupId>
			<artifactId>hadoop-client</artifactId>
			<version>2.6.0</version>
		</dependency>
		<dependency>
			<groupId>jdk.tools</groupId>
			<artifactId>jdk.tools</artifactId>
			<version>1.6</version>
			<scope>system</scope>
			<systemPath>${JAVA_HOME}/lib/tools.jar</systemPath>
		</dependency>
</dependencies>
hadoop 运行时,使用xxx-jar-with-dependencies.jar
源码分析
源码分析时可以下载https://github.com/shot/hadoop-source-reading.git